Connecting the Cloud API
How to connect the Syrve/iiko Cloud API for sending service acts — separate from the regular connection.
Where it is: Service acts →
about 3 minUpdated October 10, 2026
Service acts are not sent through the regular iiko/Syrve connection (which handles invoices) but through a separate one — the "Cloud API (service acts)" card under Settings → iiko connection. It's what ReconDoc uses to read the chart of accounts and to send acts. The card only shows up once the owner has turned on the "Service acts" section for the restaurant.
Before you start#
The Cloud API can only be connected once the regular iiko/Syrve connection (Settings → iiko connection) is set up — the Cloud API node is chosen by the restaurant's brand, which is set there. If the regular connection isn't set up, the Cloud API card shows the hint "Connect iiko/Syrve first — the Cloud API node is chosen by the restaurant's brand," and the fields are disabled.
The application credentials on the Syrve/iiko side (App ID and secret) are obtained by the owner and passed to ReconDoc not through the interface but as server-side environment variables — only the product owner does this at deploy time. In the interface, the restaurant only enters its own API key.
Where to get the key#
The Cloud API key is created by the restaurant's owner or an administrator in iikoWeb, in the integrations section. The key is tied to an organization: one key matches one organization (or several, if your account manages a chain). ReconDoc needs permission to read organizations and the chart of accounts and to create service acts. The check at connection time only requests the list of organizations, so a key with too few rights will pass it and the error shows up later — when refreshing the chart of accounts or sending an act. Copy the key whole, with no spaces at the ends.
The "Where to get the key" link next to the input field on the card leads to this section.
How to connect#
- On the "Cloud API (service acts)" card, click "Connect."
- Paste the key into the field. The value isn't visible while typing.
- Click "Check and save." ReconDoc calls the Cloud API with this key, and the key is saved only if iiko accepts it. A wrong key is never stored: you'll see the reason for the refusal and can enter the key again.
- If the key matches several organizations, you'll see "Key checked. Choose an organization" and an "Organization" list — choose yours. If there's just one, it's saved right away.
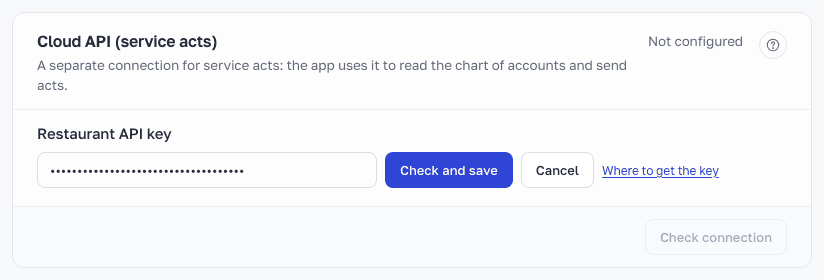
To replace the key later, click "Replace key" and go through the same steps. The old key stays in force until the new one passes the check. If the key is different, the organization and the default expense account are reset — choose them again (the organization is picked automatically if there is only one), while the act time zone is kept.
The act time zone and the default expense account are not set here but on the "Service acts" tab (Settings → Service acts). That's also where the "Refresh chart of accounts" button lives: it pulls expense accounts from the Cloud API, and the account you pick becomes the default for new act lines.
The key is ready to use once iiko has accepted it, an organization is chosen, and the act time zone is set. The "Connection is working" status on the key card covers only the first two conditions. The "Invoice / Service act" switch on the upload page is always visible when the section is on. Until the key is ready, selecting "Service act" shows a banner with the reason, and files can't be added. If only the time zone is missing, set it under Settings → Service acts. You can switch to invoices, which upload as usual.
You can also enter the key in the setup wizard: the "Connect a Cloud API key" step appears if you answer Yes, turn on "Service acts" to the "Do you use service acts?" question. If you skipped it there, connect the key here, in the Cloud API card.
Connection status#
The top-right of the card shows an indicator, with details below the key field. There are three states:
- Not configured — no key yet. Click "Connect."
- Connection is working — the key is accepted and an organization is chosen. Below it you'll see the organization and the date of the last check. The "Check connection" button in the card footer repeats the check. Uploading acts also needs the time zone (see "The key is ready to use" above).
- iiko does not accept the key — replace it — a red banner and an "Error" status. The key was revoked or has stopped working. The field for a new key is open right away. Until the key is replaced, uploading and sending acts is paused (invoices are not affected).
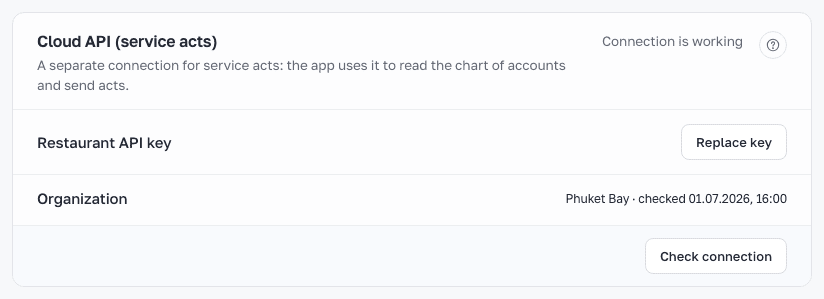
If the key is accepted but no organization has been picked yet, the status is "Not checked" and the card has a "Choose organization" button.
Who can do what#
- The owner connects and replaces the key, chooses the organization, and also changes the act time zone and the default expense account.
- ReconDoc support staff can check the key ("Check connection") and update the chart of accounts ("Refresh chart of accounts"). They can't see the key or replace it, and they don't edit the time zone or the expense account.
- Other roles can only view the card's status.
What's next
Didn't find the answer, or the guide didn't help?
Ask support