Your first invoice: from photo to a delivery in iiko
The whole path end to end, in the right order of checks — from the photo to sending.
Where it is: The invoice card →
about 15 minUpdated October 16, 2026
Let's walk one document through from photo to a delivery in iiko / Syrve. Use a real invoice — a sample document won't show you exactly where your own supplier trips things up.
Tip
If you've just finished the setup wizard, the Upload your first invoice button has already opened the upload page — take a photo of the document following the tips below and go on to step 2.
1. Photograph the invoice#
Shoot it like this
- Even light, no shadow from your phone
- One page per shot
- The whole sheet, with margins
- Smooth out the paper before shooting
Not like this
- Several invoices in one shot
- An angled shot "to fit it all in"
- A photo of a screen showing a PDF
- A shot so dark "you can still see it"
If the invoice spans several pages, shoot each one separately. You can put the shots back together into a single document during upload.
2. Upload the files#
There are two ways to get an invoice in — from the site and through a messenger. Which one suits you depends on how the work is organized in your restaurant.
From the site. Open Upload and drag the photos in, or pick the files from disk. By default every file you pick becomes an invoice of its own.
If the document arrived as several shots but you need one invoice, tick the files using the checkboxes on the left and click Merge into one invoice in the bar above the list. You end up with one invoice carrying several photos.
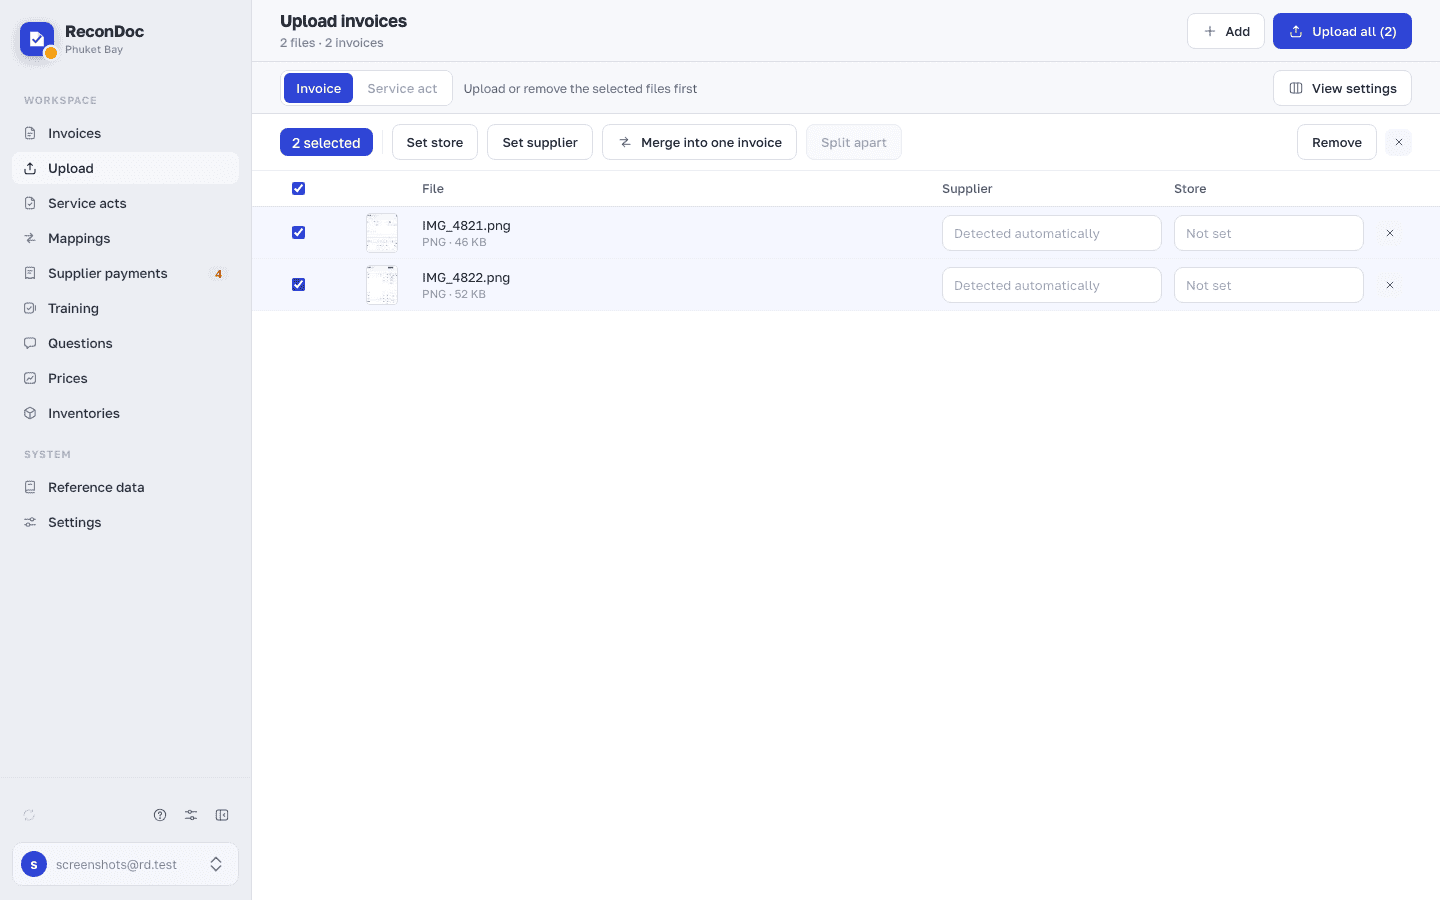
You can also set the supplier and the store right here, without opening the invoice. Or leave them: the service works the supplier out from the invoice itself. When everything is ready — Upload all. What every element of this screen means is covered in Upload.
Through Telegram. The way to do it when you're not at a computer. A shared bot is connected by default — it works right away and on any plan; you can also set up a personal bot for your own restaurant.
Send the photos to the bot. It confirms it's taking them and then waits a few seconds of silence — so you have time to send the whole batch and the question gets asked once, not for every shot. Then it asks which store to receive the goods into, and finally confirms how many invoices were uploaded, with a link to each.
You can write to the bot personally, or invite it into the group where the people who upload invoices work. How to set up your own bot, and how to link notifications to yourself, is covered in Telegram bots.
3. Wait for recognition#
Every uploaded invoice — from the site and from the bot alike — lands in the common list on the Invoices screen.
At first the document sits at Recognizing: a model is reading it and the lines are being checked against your product catalog. That takes twenty seconds to a minute, and the list refreshes on its own.
When recognition is done the status changes to Needs review — the document has been read and is waiting for you to check it.
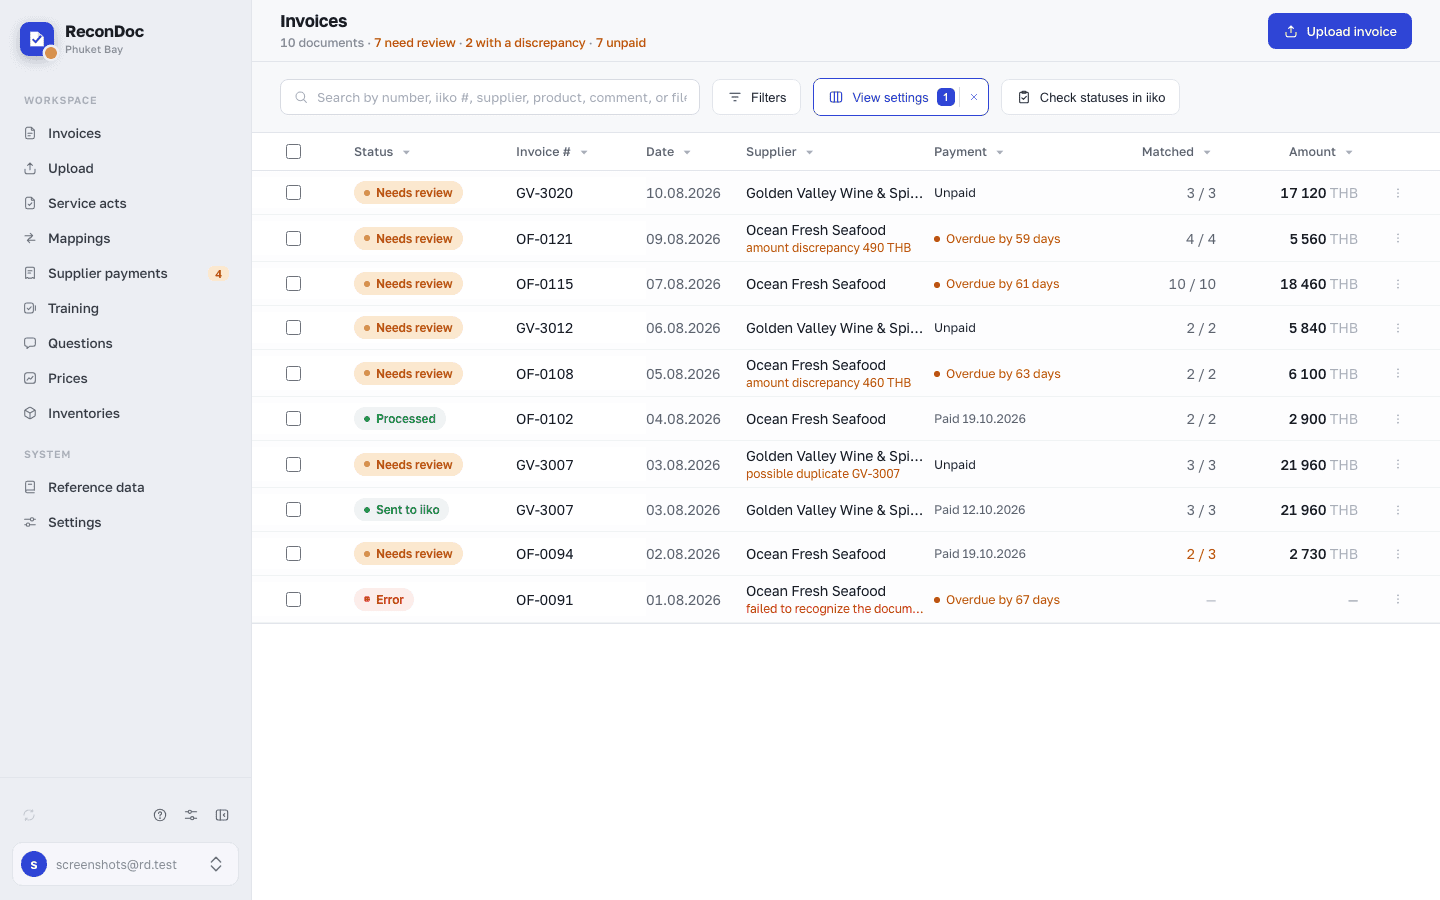
What else this screen can do — columns, grouping, filters, checking statuses in iiko — is covered in The invoice list.
4. Check the header, in order#
This is the most common rookie mistake — diving straight into the lines. The header's job is to make sure everything the document can't reach your accounting system without is filled in. Check these fields:
- iiko supplier — who the service picked from the name on the invoice; the hint beside the label shows how the supplier was written on the document itself. At the start the service doesn't know your supplier and won't always get it right — then you set the supplier, and from there it remembers the marks of that form and fills the supplier in by itself. The mappings that get filled in depend on the supplier too: under a different supplier the same line comes up empty, even if the product in iiko is one and the same.
- Document type — Invoice by default. If the file you uploaded isn't an invoice, switch the type: Reconciliation (a receipt, a reconciliation statement) or Other (a receipt, supplies, a duplicate) — such a document won't travel to iiko. Services (rent, cleaning) are a Service act: the document is recognized again and moves to the Acts section.
- Incoming document number — the number from the supplier's invoice, which goes to iiko as is. If the number wasn't recognized the field stays empty: type it in.
- Document date — iiko dates the delivery by it. If the date didn't print clearly or is handwritten, fill it in yourself.
- Due date — if you use payment terms, it's counted from the document date; see Payment terms.
- Receiving store — one store for every line. If goods from one invoice go to different stores, turn on Different store per line: each line gets its own store picker, pre-filled with the store from the header.
- Comment for iiko — if the invoice needs a note, it travels into the document's comment in your accounting system.
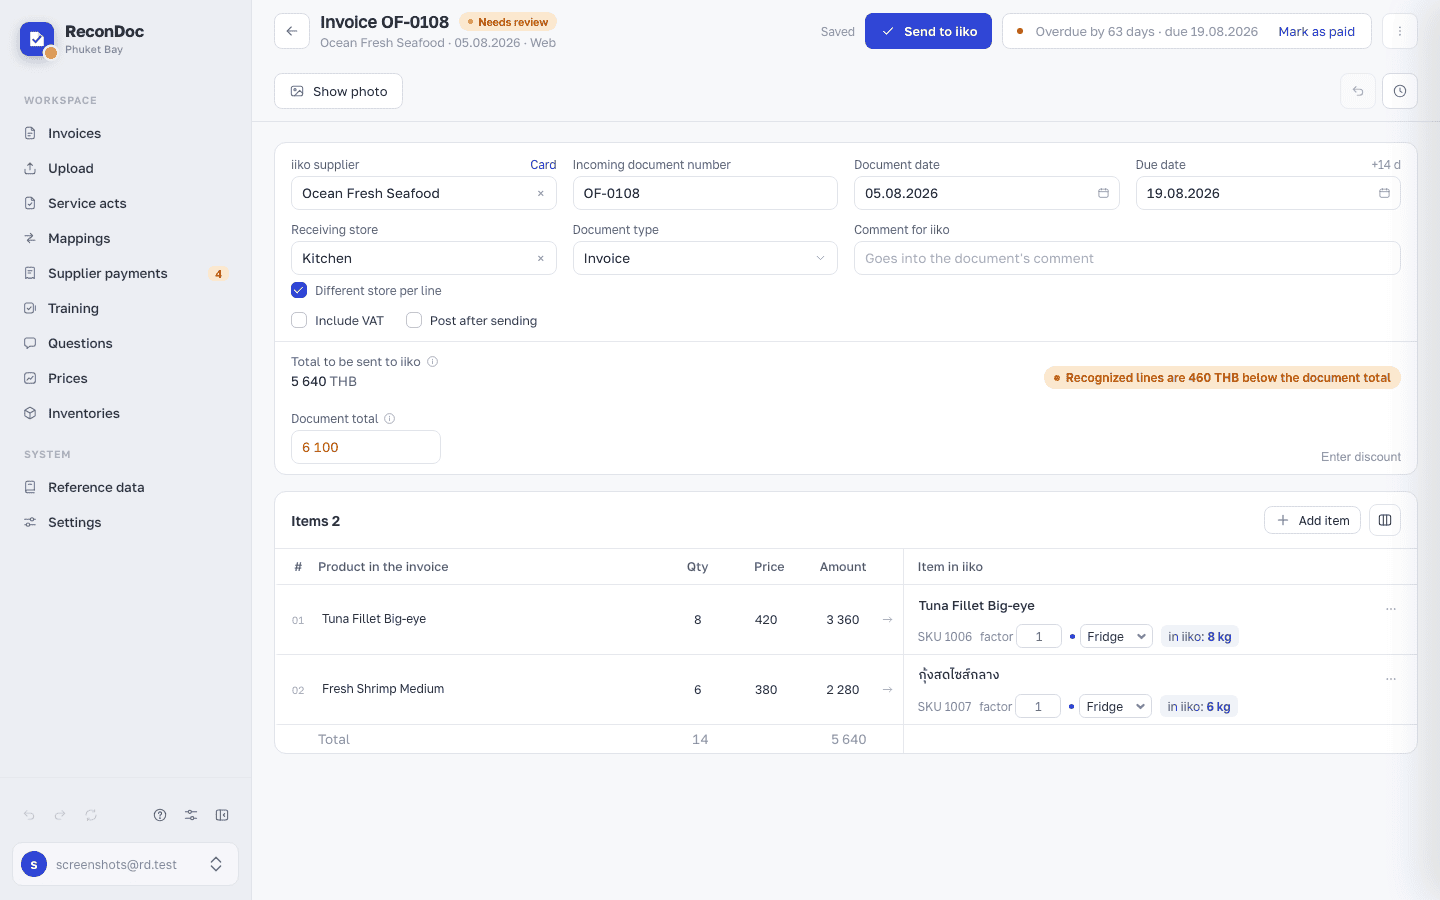
What every header field means is covered in The invoice card.
5. Link the products#
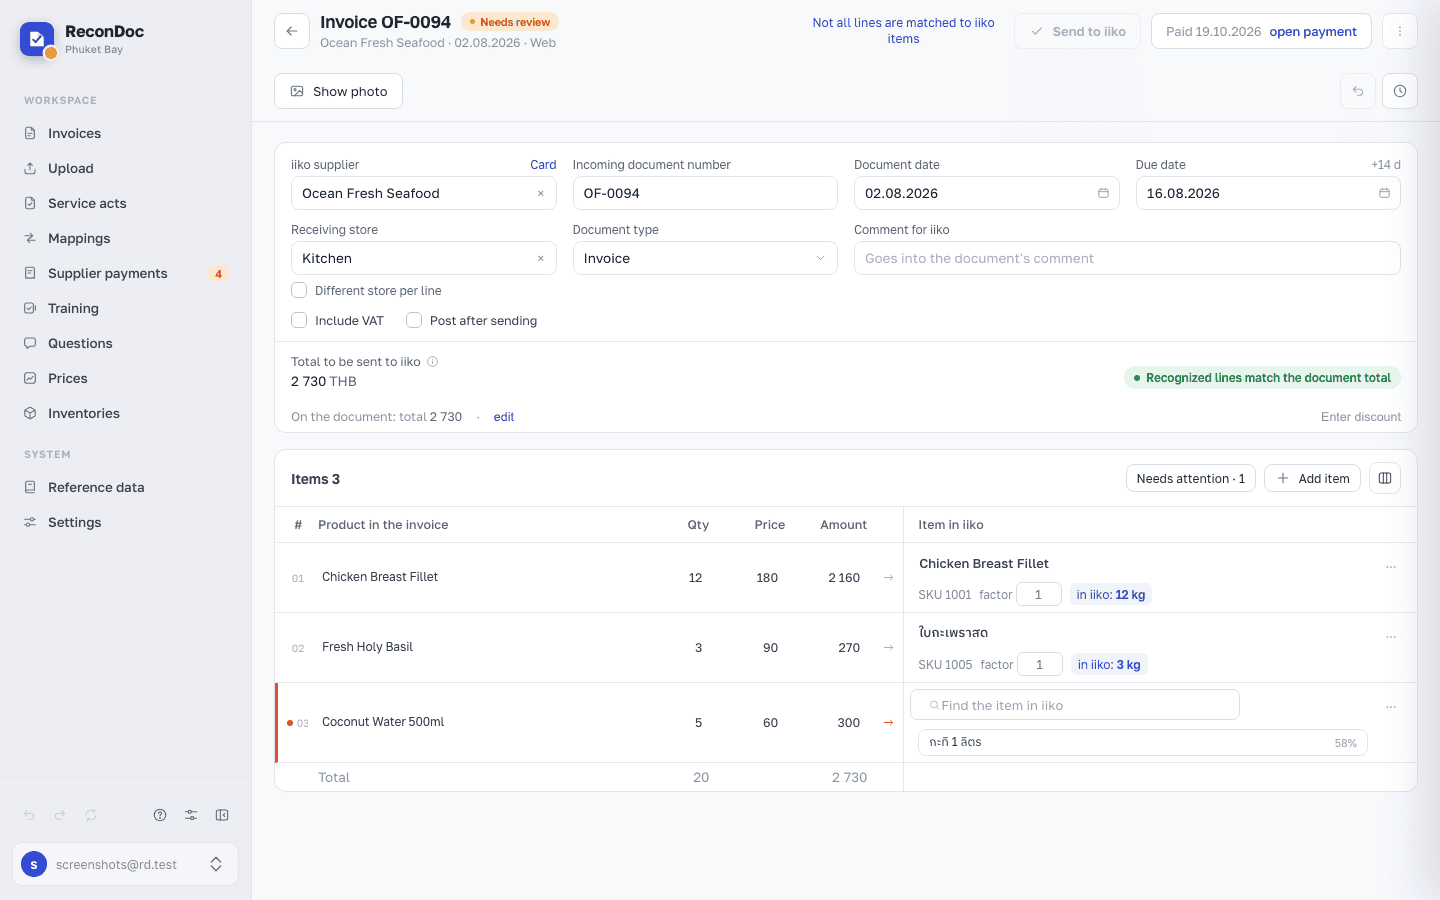
Below the header are the lines. On the left is what the supplier wrote, on the right the service fills in a product from your own catalog. The table heading shows how many lines there are in total and how many are already matched. Your job is to check that what's filled in is right.
Important
This is the longest step, and it's only that long the first time. Every mapping gets remembered for this supplier — on their next invoice the lines fill themselves in.
- Nothing was filled in — pick the product by hand in the search on the right. The service remembers that link: on the same supplier's next invoice it fills itself in.
- The wrong product was filled in — replace it. If the wrong option was the service's suggestion and you'd rather not make your choice stick, turn off the Remember toggle in the send dialog.
- Container and factor. Often not every container of a product is set up in the accounting system. Say cream arrived in a 1 litre 900 ml pack and there's no such container in the catalog. Next to the product there's a factor field — it lets you pass the right container through without creating it in iiko first. The rule is simple: quantity × factor × container is what goes to iiko. The factor is remembered per product.

- Price signal. If a price has moved noticeably away from the last delivery of the same product, the line gets a note: the price is up or down by so many percent. The threshold is ten percent either way. The signal means one of two different things. Either it's an error: the product arrived in a different container, so the unit now costs something else — the container or the factor needs fixing. Or the price really did change, and that's a reason to look into purchasing.
6. Check VAT and the discount#
The Include VAT checkbox turns itself on when VAT is visible in the document; you can also turn it on by hand — then the table gets a column with the tax amount per line.
A discount on a single line is handled by the service itself — it's already inside the line's amount. If a discount on the document total was recognized, you get a notice saying so along with an Apply to lines button: there you choose whether to split it in proportion to the line amounts or equally between them.
7. Check the totals#
The last check is the totals. At the bottom of the header, the service shows the calculated total, with the total from the supplier's document on the line below.
Total to be sent to iiko — the amount that will travel into the document: computed from the lines plus VAT. On the document — the total from the supplier's invoice, as it was recognized.
If the numbers agree and no discount banner needs a decision, the check verdict is green. If they don't, it names the reason briefly: the wrong total, an error in a particular line, VAT that differs from the computed figure, or a lost thousands separator.

A mismatch doesn't block sending, it warns you — the decision stays yours. To work out the reason, see why totals don't match.
8. Send it to iiko#
Tip
Before sending you can open the card's menu and click Link to an existing iiko document… — the service checks whether a similar document is already there. Useful when someone else on shift might have entered the invoice already.
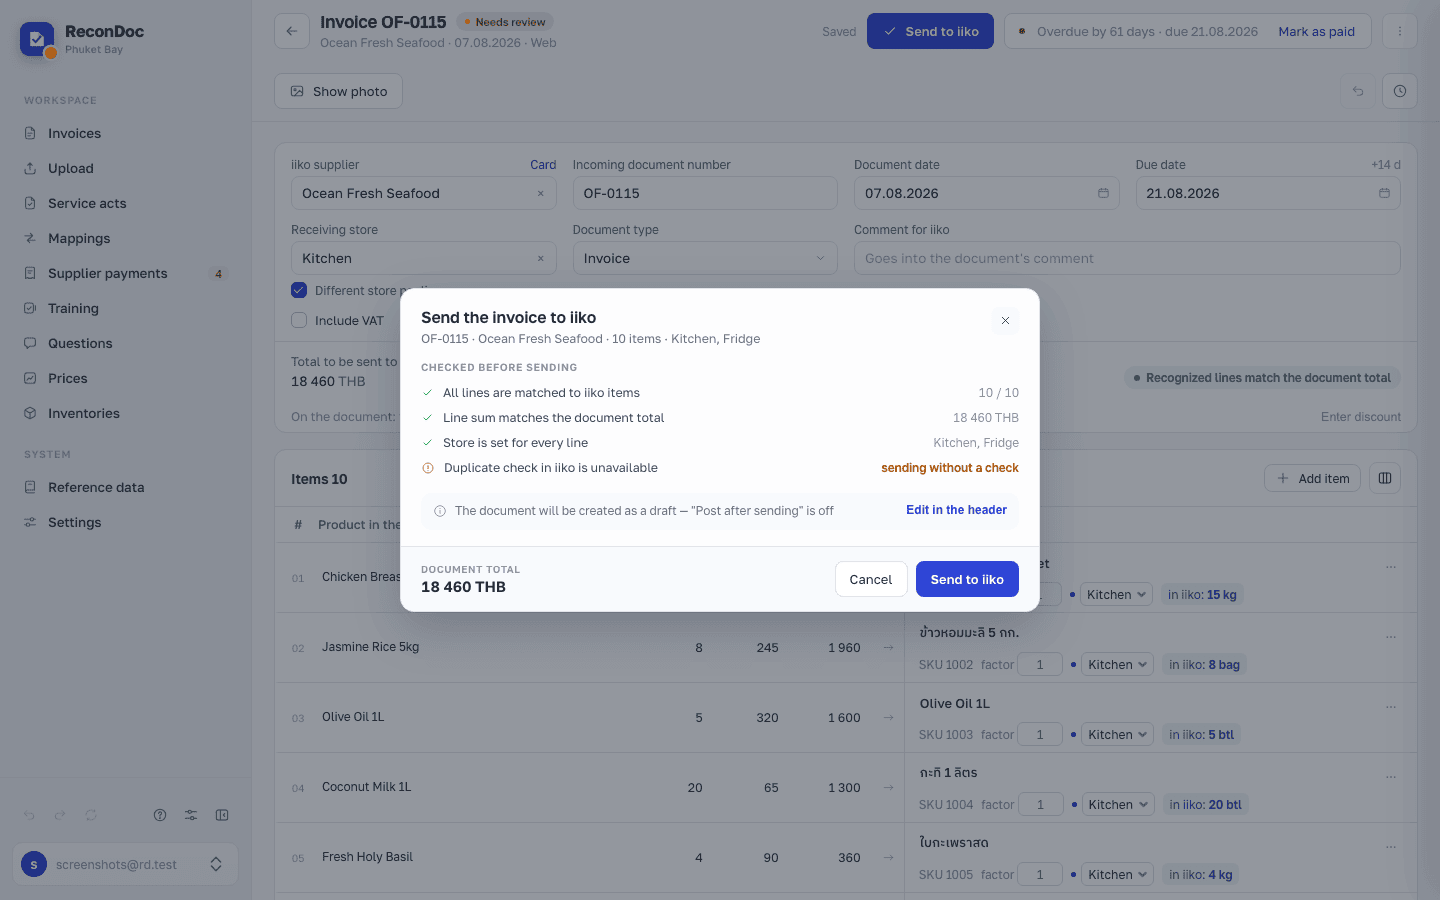
Once every line is linked and the totals agree, click Send to iiko. A dialog opens with a checklist: the service shows what it checked before sending — whether the lines are matched, whether the line sum matches the document total, whether a store is set, whether the document is already in iiko. If the connection to your accounting system is unavailable right now, it says plainly that it's skipping the duplicate check.
Careful
By default the document is created unposted — your accountant posts it. That's deliberate: until you're used to the service, it's better to check the delivery in BackOffice and post it by hand. If you want the document to be created already posted, turn on Post after sending in the invoice header.
9. Open iiko and make sure the document is there#
Don't skip this step on your first invoice. Go into BackOffice, find the incoming invoice by date and supplier, and check the lines and the total.
This isn't a formality. Until you've seen the document in iiko with your own eyes, there's no trust in the service — and you'll end up double-checking every invoice for months. Looking once is cheaper.
Done. What's next?#
After sending, the service takes you back to the invoice list — your invoice is already there, with a changed status.
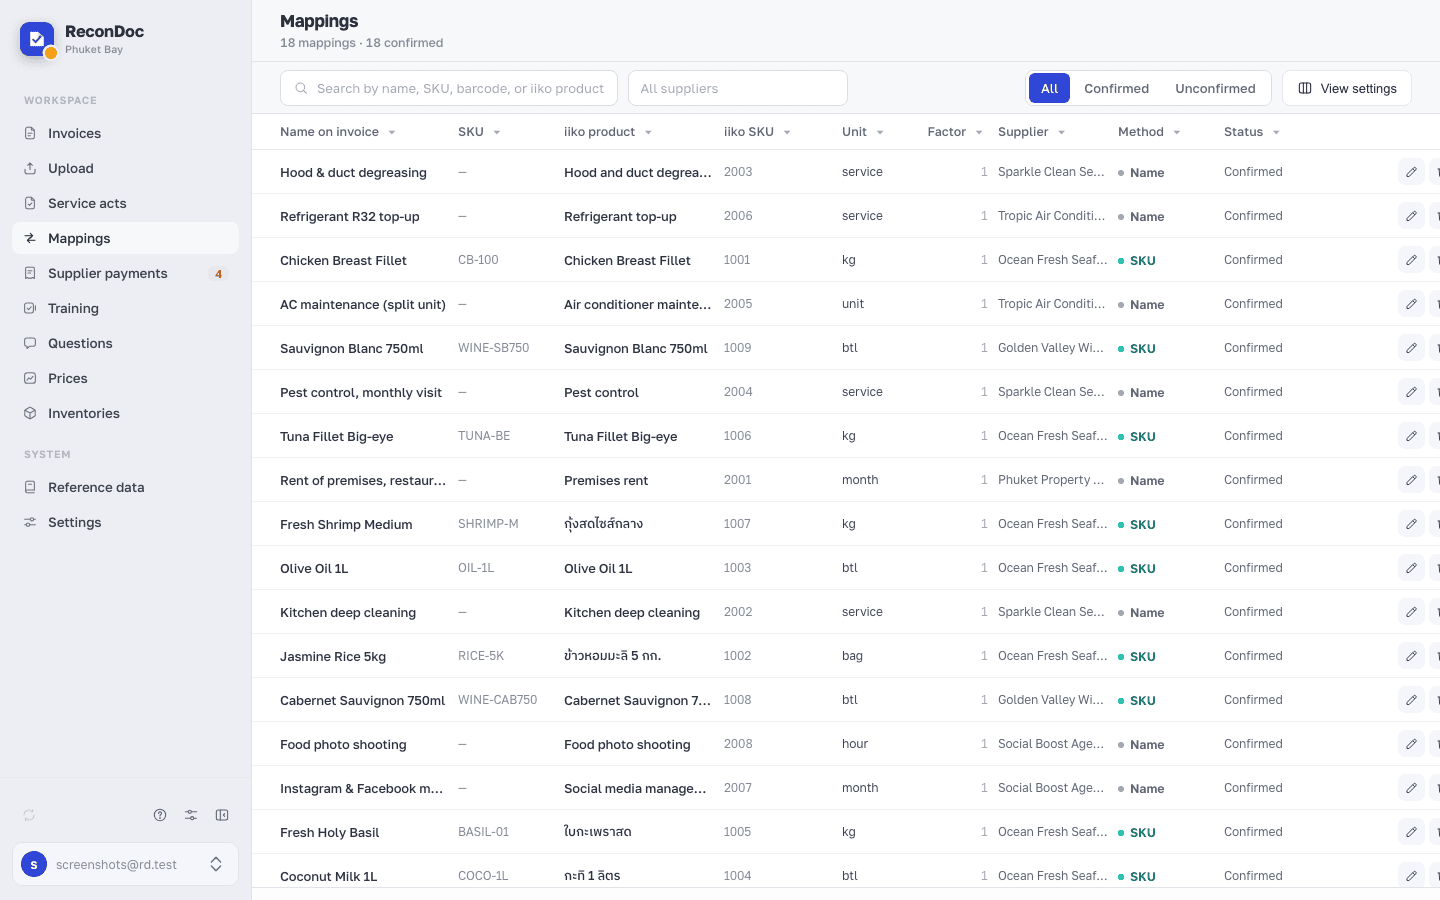
The next invoice from the same supplier will ask less of you: the mappings you confirmed today have been learned and saved in Mappings — a directory of confirmed links between the supplier's invoice items and your accounting system's catalog. You can go there and fix a link if you got one wrong.
What's next
Didn't find the answer, or the guide didn't help?
Ask support